Healthy Smoothie Popsicles: A Customizable Snack for Any Season
Forget the days when popsicles were solely a sugar-laden summer indulgence. Enter the era of healthy smoothie popsicles – a delightful, nutritious, and incredibly versatile treat that’s perfect for any time of year. Whether you’re seeking a refreshing cool-down during an unexpected heatwave (hello, Oregon summers!) or a wholesome snack to brighten a chilly afternoon, homemade smoothie pops offer a vibrant burst of flavor and goodness that’s both easy on your wallet and a treat for your taste buds.
The beauty of crafting your own easy homemade fruit smoothie pops lies in their unparalleled customizability. Imagine turning your favorite fruit smoothie into a frosty, convenient grab-and-go snack – a dream come true for busy parents, health-conscious individuals, and anyone looking to add more fresh produce to their diet. These aren’t just for kids; adults will equally appreciate these nourishing, feel-good treats!
The Allure of Homemade Smoothie Popsicles: More Than Just a Summer Treat
While the image of a popsicle often conjures visions of hot summer days, smoothie popsicles transcend seasonal boundaries. The joy of having a freezer stocked with these wholesome delights isn't limited to beating the heat. They serve as a fantastic post-workout refreshment, a guilt-free dessert, a convenient breakfast on the go, or even a fun way to sneak extra fruits and veggies into picky eaters' diets.
Think about it: store-bought popsicles often come loaded with artificial colors, flavors, and excessive sugars. By making your own, you’re in complete control of the ingredients, ensuring that every pop is packed with natural goodness. This makes them an economical choice too; utilizing fresh, seasonal fruits — or even homegrown berries like those from a backyard garden — transforms them into a budget-friendly snack that far surpasses the cost of store-bought alternatives. Moreover, for those who regularly enjoy fresh fruit smoothies, turning “leftover” liquid gold into frozen treats is an ingenious way to minimize waste and maximize enjoyment. Learn more about how to turn leftover smoothies into easy, economical popsicles and ensure no delicious drop goes to waste!
Crafting Your Perfect Smoothie Popsicle: Ingredients & Customization
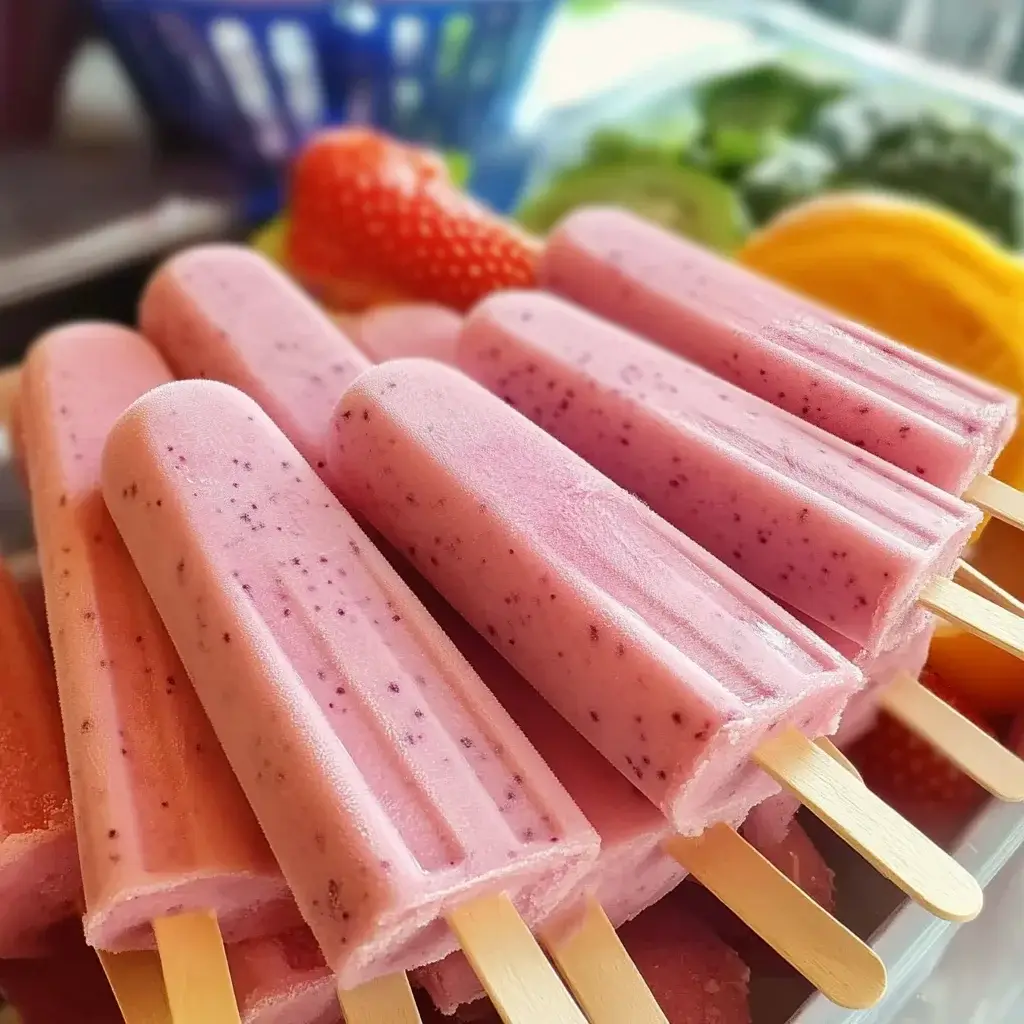
The magic of smoothie popsicles truly shines in their ingredient flexibility. Starting with a basic formula, you can unleash your creativity to design a popsicle that caters perfectly to your preferences, dietary needs, and the contents of your pantry. The core components are refreshingly simple:
- Fresh Fruit: This is where the flavor explosion begins!
- Berries: Blueberries, strawberries, raspberries, and blackberries are fantastic choices, offering antioxidants and natural sweetness.
- Tropical Fruits: Mango, pineapple, kiwi, and passion fruit lend exotic flavors and vibrant colors.
- Bananas: Essential for creamy texture and natural sweetness. Frozen bananas work wonders!
- Stone Fruits: Peaches, nectarines, and cherries add juicy sweetness when in season.
- Citrus: A squeeze of lemon or lime can brighten and balance flavors.
- Liquid Base: This helps achieve the desired smoothie consistency.
- Milk: Dairy milk (whole, skim), coconut milk (for a tropical flair), almond milk, oat milk, or cashew milk all work beautifully.
- Fruit Juice: Apple, orange, or pineapple juice can boost sweetness and fruit flavor.
- Water: For a lighter, less caloric option.
- Creaminess & Protein Boosters: Elevate the texture and nutritional profile.
- Greek Yogurt: Vanilla Greek yogurt, as highlighted in our reference, adds a fantastic creamy texture and a protein punch, making the popsicles more satisfying. Plain Greek yogurt can also be used, allowing you to control sweetness.
- Silken Tofu: A subtle way to add protein and creaminess without altering flavor.
- Avocado: A small amount adds incredible creaminess and healthy fats.
- Nut Butters: Almond butter or peanut butter can add richness and protein, especially when paired with bananas or chocolate.
- Optional Add-ins for Enhanced Flavor & Nutrition:
- Natural Sweeteners: Honey, maple syrup, pitted dates, or a splash of stevia for those who prefer more sweetness.
- Spices & Extracts: A dash of cinnamon, vanilla extract, or almond extract can add depth.
- Superfoods: Chia seeds or flax seeds for omega-3s and fiber; a handful of spinach (you won’t taste it!) for an undetectable veggie boost; spirulina for an intense green color and nutrients.
Pro Tip for Flavor Balancing: When combining ingredients, aim for a balance of sweet, tart, and creamy. For example, pair naturally sweet bananas with slightly tart berries and a creamy element like Greek yogurt or coconut milk. Taste your smoothie mixture before freezing; remember that flavors tend to be less intense when frozen, so you might want it slightly sweeter than a drinking smoothie.
From Blender to Freezer: The Simple Steps to Smoothie Pop Success
Making fruit smoothie popsicles is incredibly straightforward, requiring minimal equipment and effort. If you can make a smoothie, you can make a popsicle!
- Gather Your Tools: You'll need a good blender capable of handling frozen fruit (if using). For molds, dedicated popsicle molds are fantastic – many brands offer “groovy” designs that make unmolding a breeze. These often come with a base unit that securely holds the molds upright. If you don't own specific molds, don't fret! Small paper cups (like Dixie cups) and popsicle sticks or craft sticks work perfectly as an alternative.
- Blend It Up: Add all your chosen ingredients to the blender. Just like making your daily smoothie, blend for a couple of minutes until the mixture is completely smooth and free of lumps. If it's too thick, add a little more liquid; if too thin, add more fruit or a thickening agent like a few ice cubes or an extra spoonful of yogurt.
- Fill the Molds:
- With Popsicle Molds: Secure the molds in their base unit. Carefully pour the smoothie mixture into each mold, filling them about three-quarters of the way full to allow for expansion during freezing. Snap on the lids (with handles) firmly.
- With Paper Cups: Pour the mixture into small paper cups, also about three-quarters full. Place these cups on a baking sheet to keep them stable in the freezer.
- The Freeze: Place your filled molds or baking sheet with cups into the freezer.
- If using paper cups, let the smoothie mixture partially freeze (until it's thickened but not completely solid, usually 1-2 hours). Then, insert a popsicle stick or craft stick into the center of each cup. This ensures the stick stands upright as it freezes solid.
- For both methods, freeze overnight for best results. This allows them to firm up completely.
- Release and Enjoy:
- From Popsicle Molds: When you're ready to indulge, simply run the popsicle mold under warm water for 10-20 seconds. This gently loosens the frozen treat from the sides, allowing you to easily slip the popsicle out.
- From Paper Cups: Just tear off the paper cup — no warm water needed!
Advanced Tip: Layering for Visual Appeal: For a truly stunning effect, try making multi-layered smoothie popsicles. Blend different colored smoothie mixtures (e.g., berry, mango, green spinach). Pour one layer into the mold, freeze for an hour or two until firm, then add the next layer, and repeat. This creates beautiful, vibrant striped pops that are as fun to look at as they are to eat!
Storage Savvy: Once your popsicles are fully frozen and you've enjoyed a few, you might want to remove the rest from their molds (especially if you only have one set of molds). Simply unmold them as usual and store them individually in freezer-safe bags or containers. This keeps them fresh and prevents freezer burn, making them convenient to grab whenever a craving strikes.
Beyond the Basics: Advanced Tips for Smoothie Pop Enthusiasts
Embracing smoothie popsicles opens up a world of culinary adventure and healthy habits. Here are a few more insights to elevate your popsicle game:
- Dietary Accommodations:
- Vegan/Dairy-Free: Easily achieved by using plant-based milks (almond, soy, oat, coconut) and omitting Greek yogurt or substituting with dairy-free yogurt alternatives, silken tofu, or a creamy fruit like avocado.
- Sugar-Free: Rely purely on the natural sweetness of fruits. For an extra touch, a few drops of a natural sugar substitute like stevia can be added, but often isn't necessary with ripe fruit.
- Creative Combinations to Try:
- Tropical Sunrise: Mango, pineapple, coconut milk, a squeeze of lime.
- Berry Blast: Mixed berries (strawberries, blueberries, raspberries), Greek vanilla yogurt, almond milk.
- Green Goddess: Spinach, banana, pineapple, coconut water. (Seriously, you won't taste the spinach!)
- Peanut Butter Banana: Banana, peanut butter, milk of choice, a touch of honey.
- Health Benefits Galore: Beyond being a refreshing treat, smoothie popsicles are packed with nutrients. Depending on your ingredients, they can provide:
- Vitamins & Minerals: From the abundance of fresh fruits.
- Fiber: Crucial for digestive health.
- Hydration: Especially important during warmer months or post-activity.
- Protein: If you include Greek yogurt or nut butters, making them a more substantial snack.
- Get the Kids Involved: Making popsicles is a fantastic activity for children. They can help choose fruits, add ingredients to the blender (with supervision), and pour the mixture into molds. This not only makes snack time fun but also encourages them to eat more fruit and understand where their food comes from.
There you have it — a comprehensive guide to mastering the art of homemade smoothie popsicles. These delightful frozen treats offer an easy, economical, and endlessly customizable way to enjoy fresh fruit and wholesome ingredients. From a scorching summer day in Oregon to a cozy winter evening, they truly are a snack for any season, providing a healthy burst of flavor whenever you crave it. So, grab your blender, choose your favorite fruits, and start freezing — your taste buds (and your body) will thank you!
